Securing your website with SSL is crucial. It protects data and boosts SEO.
In this guide, we’ll walk you through the steps to install SSL on your WordPress site using WP Force SSL. WP Force SSL is an all-in-one plugin designed to simplify SSL management. It ensures your site is secure, free from mixed content errors, and constantly monitored for potential issues.
Whether you are a beginner or an expert, WP Force SSL offers an easy and user-friendly experience. Let’s dive into the details of SSL installation and make your website safer and more reliable.
Introduction To Ssl Certificates
SSL certificates protect online data and secure connections. This guide simplifies SSL installation with step-by-step instructions. Ensure your site remains safe and trusted.
What Is An Ssl Certificate?
An SSL Certificate is a digital certificate. It authenticates a website’s identity and enables an encrypted connection. SSL stands for Secure Sockets Layer. It is a security protocol. It creates an encrypted link between a web server and a web browser. This link ensures that all data passed between the web server and browsers remain private and integral.
Why Ssl Is Essential For Your Website
SSL is crucial for website security. It protects sensitive information from hackers. It also builds trust with your visitors. Google favors sites with SSL. This means better SEO rankings. Without SSL, browsers may mark your site as “Not Secure”. This can drive visitors away. Using tools like WP Force SSL makes SSL setup easy and effective. This tool provides all necessary SSL configuration features.
Types Of Ssl Certificates
DV SSL certificates are the simplest form of SSL. They only verify the domain name ownership. Getting a DV SSL is quick and easy. It is suitable for small websites and blogs. They provide basic encryption but are not ideal for sensitive data.
OV SSL certificates offer more security than DV SSL. They verify the domain and the organization’s identity. This type of SSL is suitable for businesses and organizations. OV SSL certificates show the company name in the details. Users feel more confident when they see this.
EV SSL certificates provide the highest level of trust. They require a thorough validation process. The green address bar shows the company name. This type of SSL is ideal for e-commerce sites. It assures users their data is secure and the site is trustworthy.
Preparing For Ssl Installation
First, understand your needs. There are different types of SSL certificates. Single domain, wildcard, and multi-domain. Single domain covers one domain. Wildcard covers one domain and its subdomains. Multi-domain covers multiple domains. Choose based on your requirements. For example, if you have subdomains, choose a wildcard certificate. Always opt for a reputable certificate authority. This ensures better security. Check their reviews and support options. Quality support can help in future issues.
A Certificate Signing Request (CSR) is essential. It contains your domain and company details. CSR generation varies by server type. For WordPress, plugins like WP Force SSL can help. WP Force SSL simplifies this process. Install the plugin. Follow the instructions to generate your CSR. Submit CSR to your chosen certificate authority. They will validate your request. Once approved, you will receive your SSL certificate. Install it on your server. This ensures your site is secure.
Credit: sucuri.net
Step-by-step Ssl Installation Guide
Start by installing the SSL module. Use the command sudo a2enmod ssl. Next, restart Apache with sudo systemctl restart apache2. Obtain your SSL certificate and key files. Place them in the correct directory. Update your Apache configuration file. Add the paths to your certificate and key files. Lastly, restart Apache again to apply changes.
Begin by obtaining your SSL certificate and key files. Place them in the appropriate directory. Edit your Nginx configuration file. Add the paths to your certificate and key files. Ensure the listen 443 ssl; directive is included. Save the changes and test your configuration with sudo nginx -t. Finally, restart Nginx with sudo systemctl restart nginx to enable SSL.
First, open IIS Manager. Select your server and click on “Server Certificates”. Choose “Import” and locate your SSL certificate file. Provide the password if necessary. Next, bind your certificate to your site. Select your site and click on “Bindings”. Add a binding for HTTPS on port 443. Select your certificate from the list. Click “OK” and restart IIS to apply the changes.
WP Force SSL is a comprehensive plugin for WordPress sites. It simplifies SSL configuration and management. It offers an All-in-One SSL Tool, Content Scanner, and SSL Monitoring. The plugin is user-friendly and features a Centralized Dashboard.
Pricing Details
| Plan | Price | Features |
|---|---|---|
| Personal Lifetime | $59 (Discounted from $109) | 1 site license, Lifetime updates & support, All current & future plugin features, Real-time SSL monitoring, Content scanner, Dashboard, White-label mode, Rebranding |
| Team Lifetime | $89 (Discounted from $169) | 5 sites license, All features from Personal Lifetime |
| Agency Lifetime | $119 (Discounted from $299) | 100 sites license, All features from Personal Lifetime |
Refund/return Policies
100% No-Risk Money Back Guarantee. Full refund within 7 days if not satisfied. For presale purchases, the refund period extends to 15 days after the final version is delivered.
Verifying Your Ssl Installation
Ensure your website’s security by verifying your SSL installation. Follow the steps in the SSL Installation Guide to protect data and build trust. Secure connections are essential for any site.
Using Online Ssl Tools
Online SSL tools are easy to use. They help check if SSL is installed correctly. These tools scan your site and show any issues. WP Force SSL also offers built-in tools for this. You can save time and avoid errors. Use these tools regularly. This ensures your site stays secure.
Troubleshooting Common Ssl Issues
Common SSL issues can disrupt your site. Mixed content errors are frequent. They happen when some parts of your site are not secure. WP Force SSL has a content scanner. It finds and fixes these errors. Real-time monitoring helps identify other problems. Over 50 potential SSL errors can be detected. This keeps your site running smoothly. Always monitor your SSL status.

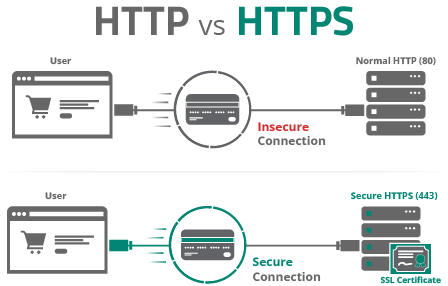
Credit: www.thesslstore.com
Maintaining And Renewing Your Ssl Certificate
Keep your website secure by maintaining and renewing your SSL certificate regularly. Follow a simple SSL installation guide to ensure your site remains trustworthy and encrypted.
Regular Maintenance Tips
SSL certificates need regular maintenance to ensure security. Check for mixed content errors. WP Force SSL has a content scanner for this. Regularly update your SSL certificate. Use a plugin like WP Force SSL to monitor potential SSL errors. This plugin can identify over 50 different errors. Always keep your plugins and themes updated. This prevents security vulnerabilities. Regular backups are essential. They protect your data in case of an issue.
Renewal Process And Best Practices
Renewing your SSL certificate is crucial. Start the renewal process before the expiry date. WP Force SSL provides real-time SSL monitoring. This ensures you know when renewal is needed. Choose a reliable certificate authority for renewal. This ensures the certificate’s validity. Follow best practices for renewal. Backup your site before starting the process. Verify the new certificate is correctly installed. Use WP Force SSL to check for any issues after renewal. This ensures your site remains secure and SEO-friendly.
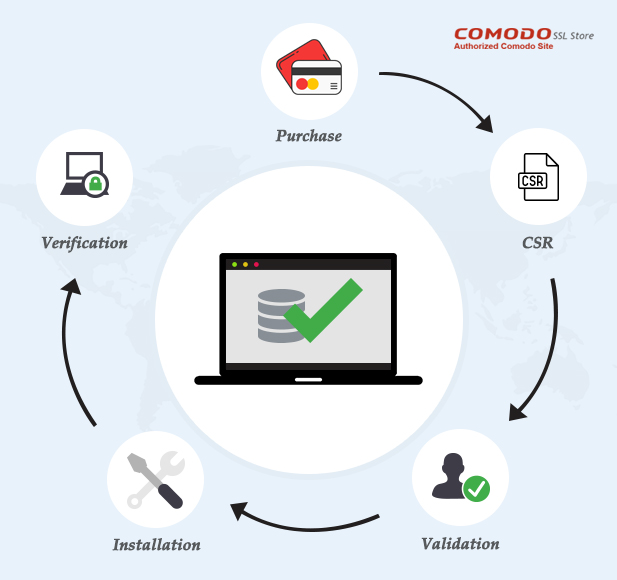
Credit: comodosslstore.com
Frequently Asked Questions
How To Install An Ssl Certificate Step By Step?
To install an SSL certificate, generate a CSR, purchase the certificate, install it on your server, and configure your website.
How Do I Setup An Ssl Connection?
To set up an SSL connection, purchase an SSL certificate from a trusted provider. Install the certificate on your server. Update your website’s configuration to use HTTPS. Check for mixed content and fix any issues. Finally, test the SSL connection to ensure it’s working correctly.
How To Manually Install Ssl?
To manually install SSL, generate a CSR and private key, purchase an SSL certificate, install it on the server, and configure your site to use HTTPS.
How To Ensure Your Ssl Certificate Is Installed Correctly?
To ensure your SSL certificate is installed correctly, verify it using online SSL tools. Check for HTTPS in the browser. Confirm the certificate details match your domain. Ensure intermediate certificates are correctly installed. Test the certificate on different browsers and devices.
Conclusion
Securing your WordPress site is essential. WP Force SSL offers an easy solution. It simplifies SSL installation and management. With its user-friendly features, you save time and improve SEO. Real-time monitoring ensures ongoing security. Choose WP Force SSL for a secure and hassle-free experience. Visit WP Force SSL to learn more.
")